Choose a backup strategy

The main driving factor in deciding how you’re going to be backing up your data is really the data itself: what the data is, how urgently you need the data back if it was gone, where you’re backing up to, how much you’re backing up, how much you’re willing to pay.
Let’s look at each of these, then look at some strategies you can use to backup your files.
Things to consider
What kind of data are you backing up?
Not just what kind of data are you backing up, but:
How important is that data?
- Not very important (I know what this data is, but I don’t really care about it).
- Somewhat important (This is useful but not that important).
- Very important (I would be devastated if I lost this data).
How replaceable is that data if it were suddenly gone?
- Trivially replaceable (I know exactly how to replace it, and I can do it in a few minutes).
- Painfully replaceable (I know exactly how to replace it, but it’s going to take hours or days).
- Irreplaceable (I can’t replace this at all).
How often do you use this data or how urgently do you need it back if it were gone?
- Not frequently used and not urgent (you have this data, but you very rarely need to open it; when you need to open it, it wouldn’t be big deal if it were gone).
- Somewhat frequently used or somewhat urgent (you use this data regularly; when you need to open it you’d need it back within a day or two if it were gone).
- Very frequently used or very urgent (you use this data frequently and you need it back within minutes or hours if it were gone).
Here are some examples of the kinds of data you could consider backing up, and some answers to the questions above:
| Thing to back up | Importance | Replaceability | Frequency or urgency |
|---|---|---|---|
| Personal photos and videos | Very important | Irreplaceable | Not something you use frequently; not urgent to get back when it’s missing, it’s OK to wait a few days. |
| Documents and assignments | Important but less important over time. | Painfully replaceable | Something you use frequently near a due date and less frequently after; urgent to get back near a due date (minutes or hours), way less urgent after a due date. |
| Web browser information like passwords, bookmarks, history. | Passwords are important, bookmarks are less important, history is not important. | Irreplaceable or painfully replaceable. | Something you use frequently. Passwords could be very urgent to get back quickly. |
| Music and videos from online. | Not very important. | Replaceable from the source. | Maybe something you use frequently, not that urgent to get back. |
| Programs installed on your computer. | Important. | Replaceable. | Something you use frequently. Could be urgent to get back, but not often. |
| Program configuration. | Not very important. | Painfully replaceable. | Something you use frequently. Could be urgent to get back, but not often. |
| Your operating system’s configuration (how you’ve configured keyboard shortcuts). | Not very important. | Trivially or painfully replaceable, depending on how much you have configured. | Something you use frequently. Not that urgent to get back. |
| Your operating system. | Important. | Replaceable. | Something you use frequently, pretty urgent to get back, but might mean bigger problems if it’s missing (failed hardware). |
Where are you backing up to?
Once you’ve thought about the data that you want or need to back up, you should start thinking about where you’re going to back up that data.
How important or replaceable your data is and the urgency that you have to get it back affect the choices you’re making here.
If you’re backing up multiple different things, you might be backing up those things to different places.
When you’re thinking about where you’re backing up to, you should consider a few things:
- How easy it is to use (“I already do stuff like this all the time” to “I need to learn something completely new”).
- How expensive it is (“I already have all required equipment or software” to “I need to buy new expensive hardware or software”).
- How reliable it is (“I still lose everything if my hardware fails” to “my house could burn down and I’m still OK”).
Here are some examples of where you could back up to:
| Place | Ease of use | Cost | Reliability |
|---|---|---|---|
| Another folder on your computer. | Very easy, it’s just copy and paste. | Very cheap, it’s just your computer. | Very unreliable; if your hard drive fails, you lose both copies. |
| Another drive in or attached to your computer. | Still very easy, it’s just copy and paste. | Kind of expensive, new drives aren’t cheap. | More reliable, can be made more reliable if you move the other drive to a different physical location. Unpowered flash storage is not long-term reliable. |
| Other kinds of physical media (CDs, DVDs, tapes). | Straightforward to use, but you might need special software. | Can be expensive; CDs and DVDs are cheap, tape drives are not. | CDs and DVDs are not long-term reliable. Tapes are very reliable. |
| Online storage tools (Dropbox, OneDrive). | Straightforward to use. You do need special software, but it’s usually simple to use. | Usually free for small amounts of data and not very expensive for more. | Generally reliable, but can fail in unexpected ways. You’re relying on the company running the service. |
How are you actually going to back up your data?
When you’ve decided where you’re backing up to, then you can think about how you’re going to make the back ups. There are two approaches to backing up data from a computer:
Image-based (drives or partitions).
This is making a byte-for-byte copy of your entire disk.
This is good because you’re copying literally everything that’s on your drive. Ideally this means that you can take a complete image, remove the drive from your computer (or move to a different computer), then restore the image to the new drive or computer and immediately have an exact copy of the whole thing.
This is bad because it takes a lot of space (you’re backing up a lot of stuff you don’t care about) and because you’re effectively treating all the data on your drive as the same kind of data (your operating system is not as important as your pictures). You also can’t trivially extract a single file from a drive image (you can, but not trivially).
File-based.
This is copying just files and folders (and maybe their metadata), and usually this means that you can open the folder in your file browser and actually see the files.
This is good because you’re only taking as much space as you need to back up what you’re trying to back up, and it means that you can be more granular about your approach to backing up your files (you can put pictures on tape in a safe deposit box and just not back up your downloaded music at all).
This is bad because you have to intentionally back up what you want to back up. You also can’t (or shouldn’t) back up an entire operating system this way.
Software
Let’s look at a few examples of software for backing up your files and evaluate them.
Copy and paste
This is… copy and paste.


cp -r source destinationYou can be more complicated than just simple copy-and-paste, though:
something like rsync
copies files, optionally preserves metadata, and can
delete files in the destination that have been deleted in the source
(synchronizing the contents of directories).
Evaluation:
- ✔️ Super easy to use, you don’t need any special software.
- ✔️ Free!
- ✔️ Granular, you can choose exactly what you want to copy.
- ✔️ You’re in control of your data at all times.
- ❌ Doesn’t preserve
metadata (unless you’re using something like
rsync). - ❌ Isn’t versioned (you don’t have the current version and old versions in your back up, just the current version).
Live-synchronizing folders
Some examples of software enabling live-synchronizing of folders include:
Evaluation:
- ✔️ Generally very easy to use, even if you need special software.
- ✔️ Usually free to use, but costs are also minimal (usually single digits per month).
- ✔️ Granular, you can usually choose which folders to synchronize.
- ✔️ Versioned, you can usually go back to older versions of files.
- ❌ You have to trust someone else to host your data (Seafile can be “self-hosted”, see the Seafile manual for more information).
Disk imaging
Some examples of software for disk imaging are:
- CloneZilla
- Acronis Cyber Protect Home Office
- Redo Rescue
ddfor Linux/macOS can copy entire disks (seeman dd).
Evaluation:
- ✔️ ❌ Some are easy to use (Redo
Rescue, Acronis), some are not (CloneZilla,
dd). - ✔️ ❌ some a free to use
(
dd, Redo Rescue, CloneZilla), some are not (Acronis). - ❌ Not at all granular, you copy an entire disk or partition.
- ❌ Not versioned.
- ✔️ You’re generally in control of your data.
3-2-1
Software enables you to actually copy or back up software, but there’s still strategy for how you manage your back ups.
One strategy is called “3-2-1”, and it’s summed up as:
- Have at least 3 copies of your data.
- Have 2 local or on-site copies of your data on different devices (two different computers, one computer and one USB drive, one computer and CDs or DVDs).
- Have at least 1 copy be remote or off-site.
You can read a lot more about “3-2-1” and its variants like “3-2-1-1-0 or 4-3-2 backups” (e.g., Seagate, Carbonite, Veeam), but this is a pretty straightforward strategy.
This strategy tries to mitigate or prevent several different things:
- Having 1 copy of your data off-site means that your data is resilient to a physical disaster where the other copies of your data are stored (e.g., fire, flood).
- Having 2 local copies means that your data is resilient to hardware failures (e.g., your disk dies, the CDs or DVDs you burned aren’t readable later).
- Having 3 copies in total means… you’ve got 3 copies in total. The likelihood of one failure happening is moderate, the likelihood of two failures happening is lower.
Restoring and verifying backups
Having your data copied to one or more other places is great, but you can’t be confident that your back ups are actually back ups until you’ve demonstrated that you can restore the back up (you can actually get the data back you thought you were backing up).
How you restore and verify your backups depends on whether you’re doing file-based backup or image-based backup.
File-based restore and verify
Verifying that your files are backed up can be as straightforward as opening your file explorer or web browser, navigating to the location where your files are backed up to, and then just manually inspecting if you have actual photos, files, and folders in that location (i.e., literally open the files and look at them).
That’s effective and easy, but not very scalable — checking hundreds or thousands of photos is tedious and painful.
We’ve seen the idea of diff before in the context of
comparing plain-text files, but we can also use
diff-like-tools to compare entire folders for
differences.
Here are some tools that will allow you to compare entire folder structures for differences:
- Meld (Meld works on all of Linux, macOS, and Windows)
- WinMerge (WinMerge only works on Windows)
- KDiff3 (KDiff3 works on all of Linux, macOS, and Windows)
- FileMerge (FileMerge is only for macOS with Xcode)
The general strategy here is this:
- Make the entire backed-up folder structure available on your local
machine. This might be downloading your entire backed-up folder
structure from the cloud provider you’re using (Dropbox, OneDrive),
inserting a CD or DVD, plugging in an external USB drive, or using
rsyncorscpto copy your files back to your computer. - Open your visual diff tool of choice and compare the two folders.
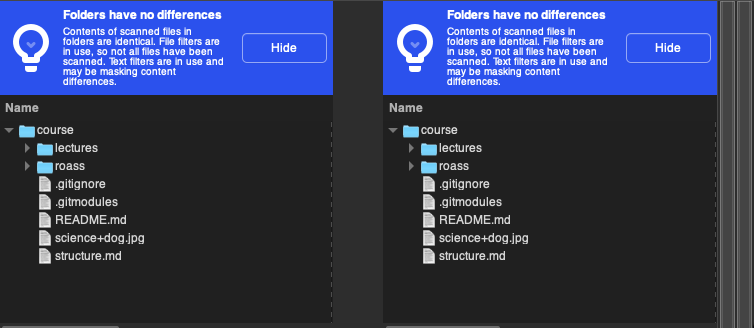
Here’s what Meld looks like when you compare two folders to one another where the two folders have no differences:

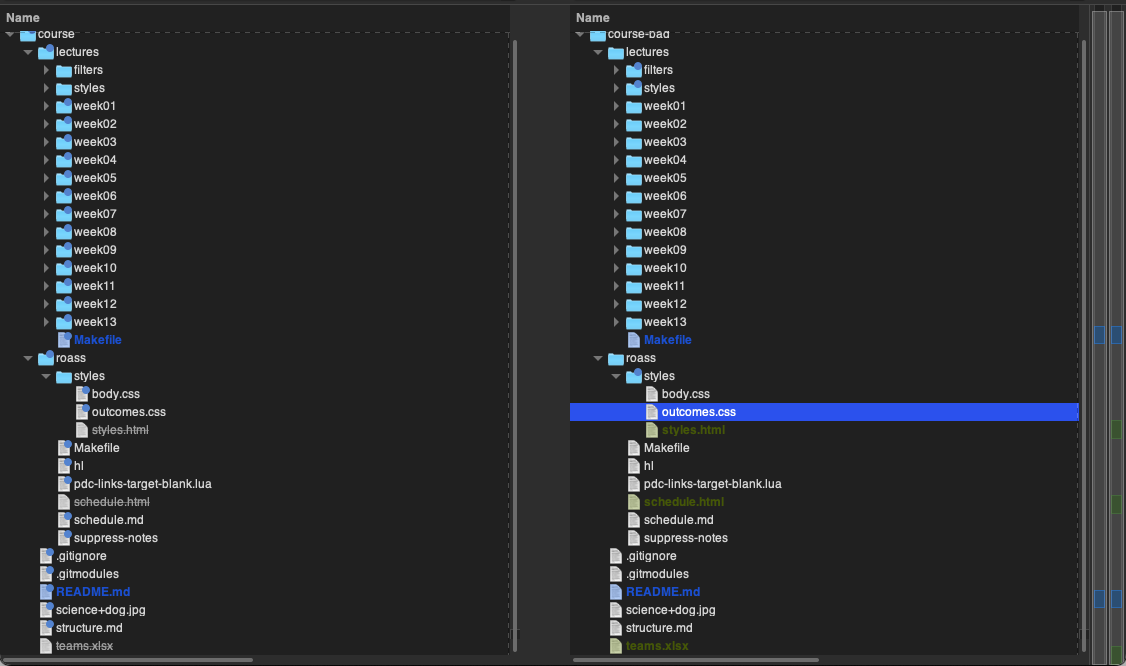
Here’s what Meld looks like when you compare two folders to one another and there’s one or more differences:

Ideally, you should see no differences between what you got from your backup and what you have locally.
Image-based restore and verify
When you back up your data using an image-based approach you wind up with a single, very large file (many GBs).
This file contains all the bytes that are either on your entire drive, or all the bytes that are on individual partitions that are on your drive.
There are two ways to verify the contents of these files:
- Mount the images and use the same approach as File-based restore and verify.
- Write your image(s) back to the same machine or a different machine.
Mount the images
This approach is primarily limited to Linux or macOS. On Linux, you can treat an individual file as a complete drive by using a “loop” device. You can take an individual file and “mount” it a though it were a drive. This is a feature of the idea that “everything is a file”.
You can do this on Windows, provided that you have something like the Windows Subsystem for Linux installed (which you should now!).
Here’s an example of how you might mount a partition image from Windows (using the NTFS file system), this might not work depending on the distribution that you’re using:
mount -t ntfs disk1.img /mnt/windowsOnce your disk is mounted, you can compare the contents using the approach described in File-based restore and verify.
Write the images
The other option is to use the same software that you used to create the images in the first place (CloneZilla, Redo Rescue, Acronis, etc) to write them back to either the same device (dangerous!) or a different device that has similar characteristics.
If you can write the images back and boot your machine again, and then use the same approach as in File-based restore and verify, you’ve got a working backup 🎉!