Advanced version control
Cloning an existing repository
We’re not the first people to initialize repositories and use version control. In fact, vast online repositories of different projects exist on sites like GitHub, GitLab, SourceHut, and more.
Cloning an existing repository from a website is straightforward
using the git clone subcommand, just like it was when you
cloned your own repository. The difference now is that we’re going to
start cloning repositories from out in the wild 🏞️.
Let’s clone a specific repository. The specific repository contains the source code that you previously downloaded on the command-line (the hello project).
Start by opening your terminal and connecting to Aviary, then run:
git clone https://code.cs.umanitoba.ca/cs-lab-course/hellogit is going to start connecting to a remote web server
that’s hosting some source code in a git repository, and
you should see output that looks similar to the following (just like you
saw when you cloned your own repository):
Cloning into 'hello'...
remote: Enumerating objects: 8, done.
remote: Counting objects: 100% (8/8), done.
remote: Compressing objects: 100% (4/4), done.
remote: Total 8 (delta 0), reused 0 (delta 0), pack-reused 0
Receiving objects: 100% (8/8), done.
There’s a lot of output here that (honestly) isn’t that important in
terms of being able to use git for tracking changes to your
files.
Just like when you created and cloned your own git
repository, the folder hello now contains another
repository. This repository contains the code that you downloaded as a
zip file!
Finding a repository’s address
Similar to connecting to a remote computer, we have to tell
git where to find the repository by giving it an address or
location. In the example above, I provided you with the complete command
to clone the repository, but sometimes you’ll find a repository that
you’re interested in cloning (including your own!).
Standard Ebooks is a web site that’s curated and published many free, high quality public domain e-books.
The team at Standard Ebooks use GitHub extensively to collaborate and track changes to the files that are used in the creation of their e-books. You can find a collection of their repositories on GitHub here: https://github.com/standardebooks
Scroll down a little bit to the “Repositories” section and pick an e-book. The titles (unfortunately) are pretty messy here, but they are readable (if you can’t pick an e-book, I’ll pick one for you: The Life and Adventures of Robinson Crusoe).
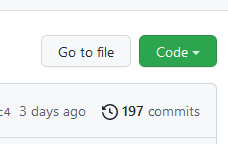
Once you click on a link to an e-book, you’ll be taken to the main page on GitHub for that repository. The main table in the center of the page is a listing of the files and folders that are in that repository. Just above and to the right of that table is a green button labelled “Code”:
Click the green “Code” button, then you can copy the text under
“HTTPS”, this is the address of the repository that you’re going to use
to tell git where it should look when it’s cloning the
repository.
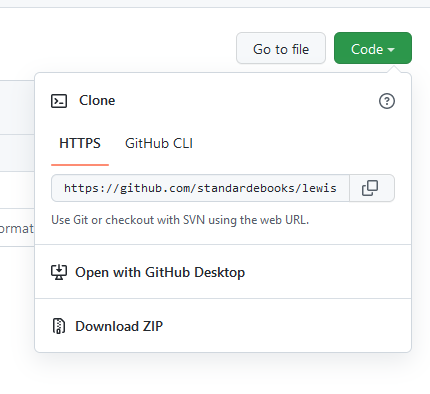
Now you can paste this link into your terminal as part of a
git clone command:
git clone git@github.com:standardebooks/daniel-defoe_the-life-and-adventures-of-robinson-crusoe.gitNow you’ve cloned a repository made by someone else! 🎉
Branches
So far we’ve been using the basic features of Git to track changes to files that we have in a repository. We can visualize these changes as a linear list:

We can literally see this if we use the git log
subcommand, and we can also get back to previous commits using the
git checkout subcommand.
Take a look at the commit history from one of your own repositories:
git logcommit 3d7739db044efa992bbfdb2d613a0fc025f39d71 (HEAD -> main, origin/main)
Author: Franklin Bristow <fbristow@cs.umanitoba.ca>
Date: Mon Sep 26 14:07:53 2022 -0500
Updating TODO.
commit 943ae855084a66fbdee8b7469f81be284e04cf65
Author: Franklin Bristow <fbristow@cs.umanitoba.ca>
Date: Mon Sep 26 13:58:54 2022 -0500
Writing more about version control.
Looking back at log messages is cool, so let's use `git log` to see them. Those long numbers that you see after the word “commit” are unique
identifiers for that commit. You can get back to the state that your
project was in at that state by using the git checkout
command:
git checkout 3d7739You can either copy and paste the complete commit ID, or you can use the first 7 or 8 characters.
When you run that command (with the appropriate commit ID!),
git will print out some information about what you can do,
including how to get back to the main branch.
You can quickly get back to the “head” (the last commit that you
made) using the git switch command:
git switch mainThis is good enough for the most part, but there’s more to Git than just keeping track of a linear sequence of changes over time. One of the most powerful concepts behind Git is that it can actually keep track of an entire graph of changes over time, possibly coming from many authors and contributors.
We’re going to take a look at a feature in Git called “branches”. Branches are something that we can use to track multiple independent sequences of commits to a repository simultaneously. When a repository has multiple branches, its commit history can look something like this:

Branches are very useful when you’re working in a team of people, who are each independently working on (for example) a feature in a bigger project. All of these people will want to independently make changes and commits, but not interfere with each other’s work until they’re finished.
You will almost certainly not use branches on projects that you’re working on by yourself. You might, and you’re more than welcome to use them, but don’t worry too much about forcing this into your version control workflow.
Because of that, we’re going to be looking mostly at the mechanical
“How do I make a branch, and how do I merge a branch back into the
main branch?” instead of the philosophy of best practices
with branches.
Creating a new branch
You can create a new branch in your git repository using
the git branch subcommand.
From anywhere inside your git repository, you can run
git branch to create a new branch in your repository:
git branch my-new-branchTypically when you make a new branch, the name of the branch should represent something about what you’re intending to work on in that branch (e.g., “new-feature”).
Listing and switching branches
We just created a branch (🎉), but… that’s not very useful in and of
itself. We want to be able to see which branches are currently in a
repository, and we want to be able to switch to that branch so
that we can track changes. We’re going to use the
git branch and git switch commands.
We can ask git to tell us which branches are in a
repository by using the git branch subcommand without
specifying a branch name:
git branch* main
my-new-branchWe can ask git to switch us to that branch using the
git switch subcommand:
git switch my-new-branch
git branch
main
* my-new-branchOnce we’re on this new branch, we can use git the same
way that we were before, adding and commiting
changes, then switch back to our main branch using
git switch.
Try creating several branches, make changes, stage (add), then commit those changes, then switch between branches to get an sense of how commits apply to branches.
Pushing branches to remote
You can also push branches that you have in your local repository to
the remote repository. You actually already did this the first time you
pushed to a remote repository with your main branch when
you did git push -u origin main. You can also push local
branches to remote with git push:
To push the new my-new-branch to the remote repository,
we would use the push subcommand with the
-u origin option:
git push -u origin my-new-branchMerging branches
OK great! Now we have one repository that has several different commit histories. If you want to think in terms of data structures (and maybe you don’t want to think in terms of data structures), we’ve effectively built a tree 🌲 of commit histories.
Having these multiple, independent commit histories is fine, but if
we’re working on a project with multiple people, and those multiple
people each have their own branch, we need to be able to take all the
work that they’ve independently done and put it back into the
main branch so that we have a single project that has
all the commits and features.
To do this, we’re going to have to “merge” the branches back
together; take all the commits from one branch, and put them into
another branch. We’re going to use the git merge subcommand
to do this.
Start by listing the branches that you have in your repository with
git branch:
git branch main
my-new-branch
* another-branchYou can merge multiple branches together by switching to the “target”
branch (usually main), then running git merge
with the name of the branch that you want to bring into that branch.
git switch main # switch back to the main branch
git merge my-new-branch
If everything goes smoothly, git will tell you about
what it’s done to your file by telling you how many files were changes,
how many “insertions” it made (additions to your files) and how many
“deletions” it made (lines or changes that removed content):
Updating 8e7c6d6..ca7accf
Fast-forward
 updated-file | 3 +--
 1 file changed, 1 insertion(+), 2 deletion(-)
Merge conflicts
Things may not
go smoothly. When two people are working independently on two
different, independent histories within a single repository, they may
need to make changes to the same file. git does a pretty
good job of automatically “merging” multiple changes to the same file,
but sometimes it can’t and you’ll get a “merge conflict”.
Let’s start again with a different branch, switch to
main, then merge changes again:
git switch main # switch back to the main branch
git merge my-other-new-branch
When things don’t go the way you expected, git is going
to report that it couldn’t automatically merge your changes:
Auto-merging updated-file
CONFLICT (content): Merge conflict in updated-file
Automatic merge failed; fix conflicts and then commit the result.
Git tried it’s best (it really did!), but it couldn’t figure out how
it should merge the changes from the different histories. When Git can’t
merge changes, it’s in a state where you either must abandon the merge,
or help Git figure out the correct way to merge things. If you just want
to bail out (give up on merging and get back to a good state in
main), you can use the --abort option:
git merge --abortAt that point, you’re back to the last commit you had on the
main branch.
You probably want to help Git with the merge, though. The way you help Git with the merge is to open the file that’s listed in the conflict and take a look. The file’s contents are going to look something like:
<<<<<<< HEAD
the content that's in the main branch
=======
the content that's in the branch you were trying to merge
>>>>>>> my-other-new-branch
Git is highlighting the change that it couldn’t merge. Your job to
help Git is to replace this entire block (everything between
<<<<<< and
>>>>>>) with what is the correct way to
“merge” this. The “correct” way to merge this, of course, depends on the
files that you’re tracking the history of. If you’re tracking Java
files, for example, you’ll have to figure out and then write whatever
the actually correct and compilable version of code should be for this
section.
Once you’ve done that and you’re satisfied with the changes, you
should add the changes that you made, then
commit:
git add .
git commit -m "Merge with my-other-new-branch"🎉! You just resolved a merge conflict!
Deleting branches
Now that our branch is merged, its commits are a part of
main, so we don’t need the original branch anymore. We
should delete it so it doesn’t clutter up our git branch
output.
We can delete a branch using the git branch subcommand
with the -d option:
git branch -d my-new-branchThis will delete the branch from our local repository, but not the
remote repository. To delete it from the remote, use
git push with -d origin:
git push -d origin my-new-branchSynchronizing projects between computers
Doing scp is, honestly, a little tedious. Even using
graphical tools is pretty tedious.
One way (among many!) that you can keep your folders synchronized
between two different computers is to use a remote git
repository, cloning and pulling on the “secondary” computer (Aviary in
this case).
You’ve already got your repository on Aviary, so let’s clone the repository onto your own personal computer.
Install Git
Git is originally a command-line tool (how you’ve been using it). You
can install git on all of Windows, macOS, and Linux. How
you install it depends on which of those that you’re using.
Installing Git on macOS
You can install Git in several ways on macOS, but probably the most straightforward way is to install Xcode. This honestly feels a bit like overkill; we’re installing an entire programming environment and multiple programming language compilers just to get Git, but it really is the most straightforward way to get Git. The easiest way to install Xcode is from the Mac App Store.
If you’re feeling adventurous, you can take an alternative approach and install Homebrew. If you take this approach, I’ll give you a link to the macOS install page on Git’s website, but you’re otherwise on your own.
Installing Git on Windows
You can install Git for Windows by downloading the installer on Git’s “Download for Windows” page. You almost certainly want to download the Standalone Installer, and you almost certainly want to download the “64-bit Git for Windows Setup”. Download the installer, launch it, and follow the instructions on-screen. You should be able to accept all default options in the install process.
If you’re feeling adventurous, you can take an alternative approach and install either winget or Chocolatey and install Git using a package manager. If you choose to take this approach, you’re on your own.
Installing Git on Linux
The best way to install Git on your Linux machine is from the command line, using your package manager. We’re not going to talk much about package managers (yet), but Git’s “Download for Linux and Unix” page lists the exact command that you need to run for most popular Linux distributions. Find yours and run it.
You do need to run these commands as the root user. If
you’ve used sudo before, this is what you should use to run
these commands. If you’re not sure what to do here, you should ask for
help.
Workflow
You can generally keep using git the way that you’ve
been using it up until now: make changes to your files, stage the
changes with add, then commit the changes to
history.
Now you should also push to your remote repository
occasionally:
git pushYou don’t need to do -u origin.
To get the changes on your other computer, you should use
git pull:
git pullDepending on what you’ve done with your repositories, you may get merge conflicts when you pull (if you edited a file on your local computer and on Aviary). You can deal with merge conflicts as described above.
Visual Git clients
Using Git on the command-line is fine, but requires you to maintain a
mental model of what branches in your repository look like.
git log and git branch can help you figure out
what’s in a branch, but it’s still tricky to keep track of all this.
Git also has a variety of graphical clients that you can use to help visualize what’s going on in your repositories, how branches relate to each other, and the changes that are in a branch. These graphical clients can also help you by doing all of the operations that we’ve been doing on the command line!
Further reading
This is a lot.
Git is an incredibly big tool with lots of ways to use it, and we couldn’t possibly look at every possible way to use it.
Instead, here are some additional resources for using Git that you can check out:
- The Documentation page on Git’s homepage. This actually has several sub-resources that you should check out: a complete reference manual for Git, “Pro Git” (a book), and a series of videos introducing basic Git.
- Learn GitLab with tutorials is a pretty comprehensive overview of GitLab itself. There’s a lot about Git in this set of tutorials, but the target for these tutorials is specifically how to use GitLab. Some of the skills that you learn here would be transferable to something like GitHub.
- Learn Enough Git to be Dangerous is a good resource for version control basics. Part of it is free, but it isn’t entirely free.
- GitHub Skills is a suite of resources similar to “Learn GitLab with tutorials”, but targeting GitHub specifically.
- Oh My Git! is a game to help learning how to use Git and its concepts.
- Learn Git Branching is an interactive and visual guide for doing branching in Git and it goes well beyond what we’re doing with branches (it includes things like “cherry picking”!).