Version Control
Version control is something that’s been around for a long time and
different people have different opinions about how to do version control
and which software should be used for version control. We’re going to
focus on a specific version control tool: git.
Version control software helps you keep track of the changes that you’ve made to your own code or any kind of file over time. Version control isn’t entirely automatic, you have to tell the software which files to track and when it should track changes.
Initializing a repository
git keeps track of things in something called a
“repository”. In terms of the things we know about so far in this
course, a “repository” is really just a directory that has some special
(hidden) files in it. Repositories can be local directories, but more
often than not repositories are also hosted on a remote server. When a
repository is hosted on a remote server, we’re going to refer to it as a
“remote repository”.
Let’s make our own new remote repository.
We’re going to be doing this not with GitHub, but with a free, open-source, and self-hostable product called GitLab. The U of M CS Department hosts an instance of GitLab (there’s a web site you can go to that’s dedicated for students taking COMP courses at the U of M) at https://code.cs.umanitoba.ca
Open that link, then we’re going to go through a few things to create a new repository.
Sign in to GitLab
The instance of GitLab hosted by the U of M CS Department has been configured to use the same account information as what you used to connect to a remote computer, so you should be able to go directly to the log in page and use the same user name and password you used when you connected to Aviary. Remember: you changed your password the very first time you connected to Aviary!
If you are unable to log in to GitLab because you have forgotten your password (don’t worry, it happens to everyone at some point!), you may need to change your password.
You can coordinate changing your password for CS resources by e-mailing our tech staff at mailto:cs-support@lists.umanitoba.ca.
While the two accounts are effectively tied together by the department, using the same credentials (username and password) for different services isn’t a best practice. Consider starting to use a password manager to generate and securely store your passwords. I can personally recommend KeePassXC, but some people like 1password. Others prefer to manage their passwords on the command line and can use tools like pass.
Main advice: don’t use the same password for everything; don’t write your password on your hand.
Congrats! You just signed in to a version control repository service! 🎉
Create a new repository
Now we get to the part that we’re really interested in: actually creating a remote repository to upload our code to.
Just after you finish creating your account, and each time you log in to GitLab, you’re going to be at your dashboard.
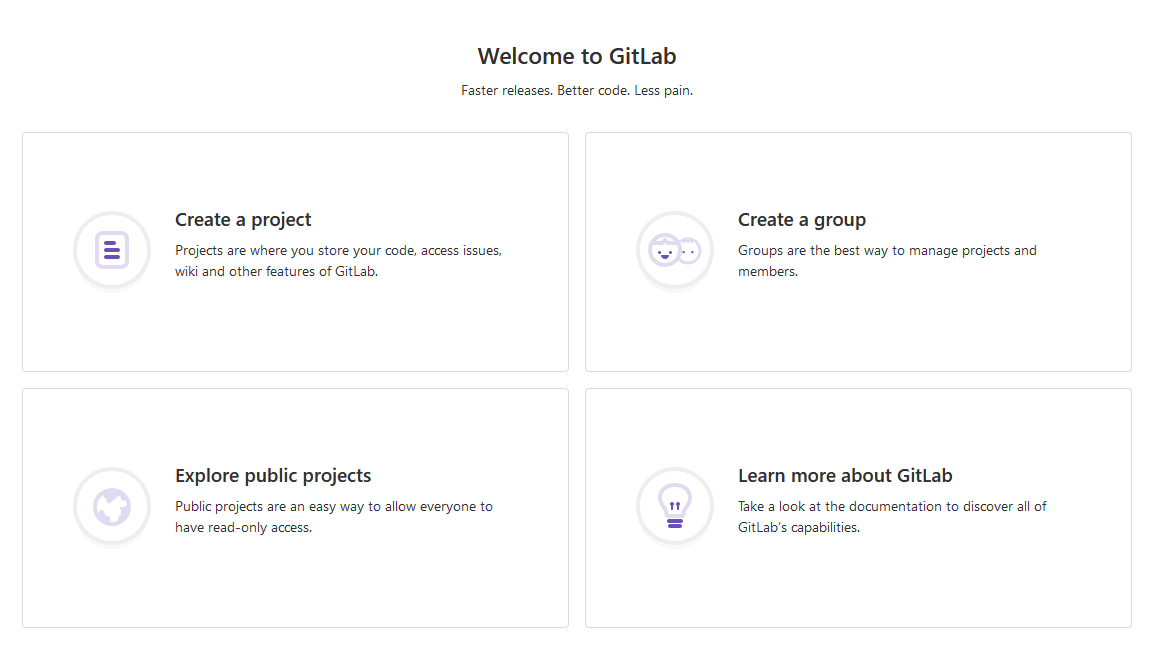
Click on “Create a project”. There are several options you can choose from to create a project, but for now you should click on “Create blank project”.
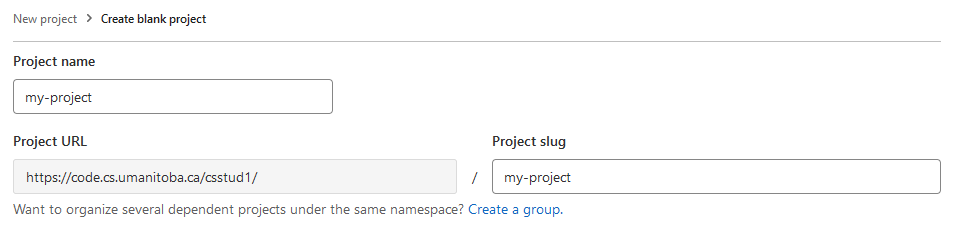
Now you get to be creative by picking a project name. The project
name that you enter here will become part of the project’s URL (the
address or location of the repository). If you want to start putting
your course documents into this repository (like you might in an
assignment), you should pick something like a course name (e.g.,
COMP1002).
Kind of like when you were organizing your files, creating a repository has some amount of decision making in terms of what you’re planning to put into a repository.
When building software we usually just make one repository for one application, but some organizations use different strategies. A good general strategy might be “one repository for one piece of work”.
For the purposes of this book and course, I would recommend that you make one repository per course (e.g., make a repository for COMP 1002, make a separate repository for COMP 2280, make a separate repository for COMP 4820, etc).
Other options that you might consider (for coursework or in general) are a repository for each:
- Assignment,
- Code library,
- Project,
- Publication.
The only option you have for visibility is “Private”, and you should leave it that way.

Some repository hosting software (like GitHub) provide the (default) option to have public repositories. While public repositories are important, in circumstances where you’re planning to put your course documents into the repository (which you should be!), you don’t want to risk having your course documents being publicly available and accessible. In short: avoid academic misconduct situations by keeping your repository private.
You’ll also see some options for project configuration. You should
deselect everything for your first repository. It’s not
going to hurt to have a default README.md added to your
repository, but we’re ultimately going to change what this
README.md says.

Finally, click the “Create project” button. If everything’s worked out, you should see a new (and empty) project page:
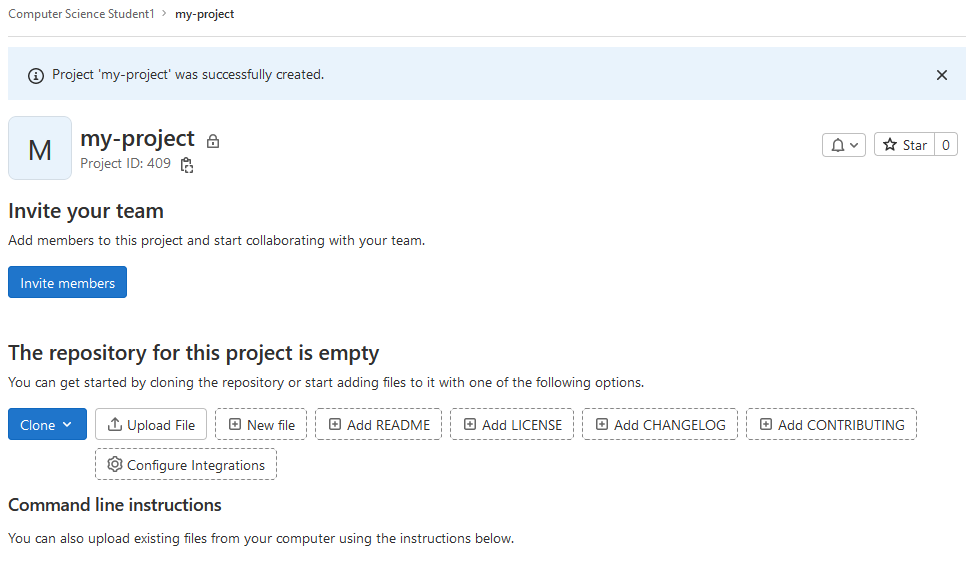
You just created a new remote repository! 🎉
Now that we’ve got an empty repository, we want to start adding files to it.
Cloning a repository
To be able to add files to our repository, we’re going to need to get
the repository into a spot where we can use it. You should do this on
Aviary, but you can do this on your local machine. If you are
doing this on your local machine, you will need to install git.
Open your terminal and connect to Aviary 🐦.
The main way that we get a remote repository onto our own machines is to “clone” the repository. We only need one piece of information to clone a remote repository: the address of the repository.
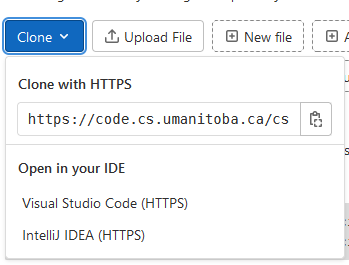
You can find the address of your repository in two places:
The address bar of your browser, or
By clicking on the blue “Code” button on the repository page.
Once you know the address of the repository, you will use
git on the command line to get your repository onto Aviary;
specifically you will use the command
git cloneI (me, Franklin) created a new repository with the name
hello-world. The address bar in my browser has the
address:
https://code.cs.umanitoba.ca/fbristow/hello-worldTo get this repository into my user directory on Aviary, I would run the following:
git clone https://code.cs.umanitoba.ca/fbristow/hello-worldCloning into 'hello-world'...
Username for 'https://code.cs.umanitoba.ca': The remote server is now asking me to enter my username and password. You should use the username and password that you used to create your account on GitLab.
Once you’ve entered your username and password, git will
clone your repository:
remote: Enumerating objects: 5, done.
remote: Counting objects: 100% (5/5), done.
remote: Compressing objects: 100% (4/4), done.
remote: Total 5 (delta 0), reused 0 (delta 0), pack-reused 0 (from 0)
Receving objects: 100% (5/5), done.
Now if you check out what’s in your directory, you should see a new folder:
lscomp1002 bin hello-world🎉, you’ve just cloned the remote repository to your local user directory. Now you should change directory into that repository!
Adding files to a repository
Version control software generally requires that you tell it specifically which files you want it to keep track of. That means that Git isn’t going to keep track of files that just happen to be in the same directory as the repository, you have to tell Git to actually keep track of those files.
Create some new files in the repository:
Make a new plain text file with some text in it using a command-line text editor like
vim. Name the fileREADME.md.Transfer a file from your computer to Aviary into this directory.
Copy the
hellofolder from wherever it is to this directory.You can copy files from one place to another on the same computer using the
cpcommand. You can copy entire folders from one place to another using the-roption for recursive (just likescp!).To copy the
hellofolder here, you can usecpfrom this directory:cp -r ../hello . # if hello is in the parent directory
Even though we put these files into this directory with the repository, Git still doesn’t know anything about them. We have to add these files to the repository in two steps:
- “Staging” the changes by adding them with the
addsubcommand, and - Committing the changes using the
commitsubcommand.
“Staging” changes
Adding files to the repository is straightforward: you use
git add and then tell Git which files should be added to
the repository.
Files that you add with git add are “staged” — Git knows
that the files exist and that you want it to track changes to these
files, but Git isn’t actually ready to track the changes.
You can add files and changes to the repository one at a time using
git add and including the name of the file that you want to
add:
git add README.mdYou can also add entire folders to the repository:
git add helloYou can also add everything in the current working directory to the repository:
git add .Git doesn’t tell you anything when you add files or changes to be
staged, but you can ask Git to tell you about the current state it’s in
by using the status subcommand.
You can find out which files or changes are staged to be committed
using git status:
git statusOn branch main
No commits yet
Changes to be committed:
(use "git rm --cached <file>..." to unstage)
new file: README.mdGit helpfully tells you how to unstage a file if you accidentally added a file or change you didn’t want to add to the repository.
Committing changes to the repository
Even though Git knows about the files or changes that you’ve staged, you haven’t told git that you really want it to track changes to those files.
A “commit” is what Git really manages: what a specific set of files looked like at a specific point in time.
When you make a commit to a repository, you’re telling your version control software that the changes that you’ve made to these files are important and it should keep track of that. Some important times where you would want to keep track of things:
- The first time you create a repository and you’re adding some files to it.
- When the thing you’re working on works.
- When you’ve finished working on a small part of a bigger project.
When you make a commit to a repository, you have to include a “commit message”: a brief, human-readable message describing what you’re committing to the repository.
We can commit staged changes to our repository using the
commit subcommand.
Unfortunately, we’ve got to do some one-time set up before we can make our first commit. It’s OK If you skip this step (you can fix it later), but things will flow more smoothly if you do it now.
Before we can make a commit, we need to tell git who we
are. We can configure git and tell it who we are with the
git config command:
git config --global user.name "Your name"
git config --global user.email you@myumanitoba.ca # you should use your own
                                                  # e-mail address here.
You only need to do this once per physical computer that you’re using
git on. In other words: if you’re using two computers,
you’ll need to run this set up step on each computer, but you only need
to do it once.
We can commit staged changes to a repository using
git commit and either writing a commit message in the
command itself, or writing a longer commit message in your text
editor.
# commit with a message inline
git commit -m "Initial commit"
[main (root-commit) acff39c] Initial commit
1 file changed, 10 insertions(+), 0 deletions(-)
create mode 100644 README.mdYour commit is going to look different from mine because you added more files than me to your commit and you used a different commit message.
You can write a longer commit message by leaving out the
-m part, and this will ask Git to open up your text editor
where you can write a longer message.
git commit # opens your text editor to write a messageAfter you commit your changes to the repository, everything still looks pretty normal. Your files are all still there. Great 🎉!
You can ask Git to tell you what its status is again with
git status, but this time it’s just going to say that there
is nothing to commit
git statusOn branch main
nothing to commit, working tree cleanGit commit messages are important metadata (data about your data) that help you (or others) better understand the changes that you’ve made to your files over time. They’re a lot like writing comments in code in the sense that they shouldn’t describe the files that you changed or even describe how you changed the files, but should describe why you changed the files and what the ultimate side-effect is (“I fixed this bug!”).
Lots of people have opinions on Git commit messages:
- Tim Pope writes about them in A Note About Git Commit Messages.
- Chris Beams writes about them in How to Write a Git Commit Message.
- Randall Munroe visualizes them in Git Commit.
Adding changes and committing them to your repository is something that you should be doing not just when you initialize the repository, but frequently as you’re doing your work. You should add any changes to your repository each time you accomplish something (a new method is working, a bug has been fixed, a feature is complete).
Reverting changes
Initializing our repository and adding and committing files and changes to our repository is great, but just adding stuff to the repository isn’t exactly useful.
One important use for version control is being able to go back in time to changes that were previously committed to the repository.
Let’s make some changes to our file. We don’t actually care what the changes are because we’re making these changes to be able to see how to undo changes.
We can revert uncommitted changes to a file using the
restore subcommand in Git.
Mess up your README.md. Go ahead. Have fun!
Here are some things you can do:
Open it in your text editor and start typing.
“Accidentally” copy a file and replace
README.mdwith that filecp hello/compiled/hello.c README.mdRemove your
README.mdrm -f README.md # LIVE DANGEROUSLY
Once you’ve made changes to your file, you can ask Git to tell you
about the status of the file (with git status). Depending
on what you did, Git will tell you different things, but it will
importantly notice that something has changed. Git will also
helpfully give you a hint about how to get your files back to the state
they were in before.
Now revert the changes you made to your README.md with
the restore subcommand
git restore README.mdNow open up your README.md again, and it’s back to the
way it was before you made the changes!
Files that shouldn’t be version controlled
Being able to keep track of changes to our important files is great, but there are some files that will have changes that don’t care about.
Some examples of files that will change as you change your own files:
- The
.classfiles that get generated when you compile Java programs. - The
.docxand.pdffiles that you generate when converting from Markdown to those formats. - Output files that get generated when you run certain programs.
The common identifying property of all of these files is that they
are files that get generated or created by something
else from the file that you want to keep track of (.class
files are generated from the .java files you care about;
.docx in this case is generated from the .md
files that you care about).
We don’t usually want to include these files in a version control repository for a couple of reasons:
- We can really quickly re-generate them from the files that we’re
working from (it’s pretty easy to run
pandocagain!). - Sometimes these files can be really big in terms of file size.
- They are extra changes in our version control history that we don’t care about.
We can tell Git to ignore certain files when they change by created a
special file named .gitignore in
our repository.
Use your text editor to create a new file named
.gitignore in the same folder as your repository.
Each line in a .gitignore file is either a comment
(lines beginning with #) or describes specific filenames or
“patterns” of filenames to be ignored.
Here’s an example of what a .gitignore file might look
like:
# Ignore README.docx (a specific filename)
README.docx

# Ignore all .class files (a "pattern", any file that ends with .class)
*.class

# Ignore the entire build directory
build/
The .gitignore file is a file you want Git to
keep track of, so you need to add this file to your repository (use
git add).
Just like the .git folder, the .gitignore
file is “hidden”, it doesn’t show up when you try to look at the
contents of a directory using commands like ls. This is
true in general: any file that begins with a period (.) is
considered to be “hidden” on Linux and macOS, but you can see those
files by telling a command like ls to list everything
(ls -a).
Pushing to the remote repository
Now that you’ve made your repository and added files to it, we want to push all the commits that you’ve made (and thus all the files) to the remote repository. Pushing to the remote repository is something that you should do often, our goal is to make sure that the local repository you have is approximately synchronized with the remote repository on the server.
You can push all commits to the remote repository using the
git push subcommand:
You really just need to run:
git pushafter you’ve made some commits.
Just like when you initially cloned the repository, git
is going to ask you to enter a username and password. The username and
password that you enter here are the ones that you chose when you signed
up for your GitLab account at https://code.cs.umanitoba.ca.
You might see output similar to the following:
git pushUsername for 'https://code.cs.umanitoba.ca': you@myumanitoba.ca
Password for 'https://you@mumanitoba.ca@code.cs.umanitoba.ca':
Enumerating objects: 3, done.
Counting objects: 100% (3/3), done.
Writing objects: 100% (3/3), 225 bytes | 225.00 KiB/s, done.
Total 3 (delta 0), reused 0 (delta 0), pack-reused 0
To https://code.cs.umanitoba.ca/you/comp-1002.git
* [new branch] main -> main
Branch 'main' set up to track remote branch 'main' from 'origin'. Now refresh your browser window that has the remote repository, and you should see some files! 🎉
Further reading
This document gets you started with version control and Git, but you’re definitely going to run into situations where you want to do things that are more complex than what we’ve seen here, or you’re going to make a mistake and need to fix it.
You can find lots of good information online about Git and version control, but here are some resources that are particularly good or helpful:
Roger Dudler’s git - the simple guide does a great job of quickly summarizing the tasks you might need to do when doing version control with Git.
Seth Robertson’s On undoing, fixing, or removing commits in git is a “choose your own adventure”-style guide on … well, undoing, fixing, or removing commits in Git! Maybe you accidentally committed a file that you don’t want to be in your repository, or maybe you accidentally forgot to include a file in a commit that should have been included in that commit. This will guide you through getting into the state that you want to be in.
If you’re OK with some profane language in English, Katie Sylor-Miller’s Oh Sh*t, git!?! is also an excellent source of solutions to “Please help me!” moments that you will definitely encounter when you’re using
git.Yeah. I know you can swear on the internet. But I have children. One of my children can read and the other is learning to read, and they will both eventually be able to figure out what sh*t means (and I’m OK with that), I still feel some parental sense of responsibility to keep it clean.